I’ve always loved coffee and latte art had always secretly been on my bucket list but things got really serious when I was gifted the Breville Barista Express. I will be completely honest, I was totally overwhelmed and frustrated the first few days because I just didn’t get it! I watched countless YouTube videos, read articles, spent a morning at Grand Cafe with the barista trying to learn as much as I could. I told you…I’m determined!
But if you want to get serious about your coffee I highly recommend this machine just as it came highly recommended to me! Plus you have me to guide you through the process and make your experience far easier than mine! This machine grinds the beans fresh for you, extracts gorgeous espresso, and has a milk frother attached. It’s the real deal. The price is steep but worth every single penny. I promise!
Here are the basics that I’ve learned along the way:
Coffee Beans and Crema:
-Fresh beans are key! Trader Joes apparently is known to have great quality coffee. My friend recommended this one to me and I absolutely adore this coffee. I’ve played around with one other bean that I picked up in LA but this one is my absolute favorite so far. I will keep updating you as I try new ones.
-Apparently once you find the bean you like and find the right grind size you should stick with that coffee. Otherwise, you will likely need to keep adjusting the setting based on that coffee.
-To make it easy for starters go buy this coffee from Trader Joes. It’s a very oily dark bean which help creates that lusted for crema.
What the heck is crema anyways? Here’s what I found online:
First, let’s define our terms here: Crema is the initial light/tawny colored liquid that comes out during an espresso extraction. It is what causes that ‘Guinness effect’ that folks sometimes reference. As the lighter liquid infuses with the darker liquid that comes after, it filters up and ‘settles’, leaving a tan colored layer on top of the darker espresso below.
The formation of crema is a blend of a few different things: As water is forced through the coffee under pressure, it emulsifies the natural fat/oil content in the bean, suspending it in tiny microbubbles of air. Additionally, after the coffee is roasted, it out-gases C02 for a while (generally for the next 24 – 72 hours post-roast) and so coffee that was more freshly roasted will also emit some C02 during extraction. (source: Seattle Coffee Gear)
Crema is what serves as the perfect canvas for latte are but it just has this fluffiness, richness…is it morning yet??
Now getting that crema isn’t the easiest and it took me some time to achieve the perfect grind size for my coffee beans (I went through many cups of coffee-and loved every single cup of it!) but if you’re buying this coffee below, you can set your machine to grind size 4 and it should be perfect like mine now is!
-I store my beans in the original can in my pantry. Apparently you’re not supposed to store it in the fridge or freezer! Who knew?

Grinding and Coffee Extraction
-Pour your beans into your machine, fill up the water tank and you should be ready to go.
-I always make double shots so I place the two cup single wall filter in my portafilter. Press it in tight and place it under your grinder. Set your machine to grind double shot and push to start grinding. Stop the grinding and press the ground espresso down with the tamper. apparently you want to put 30 lb of weight but just press down with a little force to pack it in. Grind again until it’s mostly full. Press down again and then you can use the razor it comes with to see how full you should fill the portafilter. This is important for pulling perfect shots. Packing too tight or too loose will affect the coffee taste and quality because the water flows through it at a different rate. But once you make a few cups it becomes natural. Also the more you use the machine, and the older it is, the better the quality apparently. A new machine is never as good as a seasoned one!
You now should be ready to start brewing. But I always froth my milk first!
Milk Frothing
-Fill your metal cup halfway with COLD milk of choice. The more fat content you have in the milk, the better it will froth. If you’re looking to use nut milk, I’m in love with Elmhurst Cashew milk and use it every single day!

-Turn on the frothing wand and let the water spray onto a towel on the counter-you don’t want that extra water in your milk. It’s completely normal for water to spray out initially and for it to make loud noises. Once it’s just steam that’s being released stop it for a second, place the wand in the cup and then turn it on again.
-Begin steaming by getting the milk to spin rapidly clockwise, then work the surface of the milk for about 15 – 20 seconds. Bring the tip of the steam wand to the top, so that it just barely breaks the surface to suck in air and milk simultaneously. You want it to make a slight hissing noise or as someone on Instagram told me it should sound like smooth kissing! If it’s making a crazy loud shrieking noise that means your steamer is too far into the cup and needs to be pulled up closer to the surface.
-Plunge the steam wand all the way into the milk and then roll the milk for the remainder of the time. Temperature-wise, your milk should measure between 140F – 160F degrees — if it’s too cold, it will be chalky; if it’s too hot, it will be scalded.
-Using your now damp towel clean the milk off of the wand while simultaneously turning the steamer on for a few seconds to clean it out.
-Tap the pitcher on the counter to settle the milk and force any air bubbles to the top. You don’t want those in your latte art!
Prior to pouring, roll the milk slightly around the pitcher to incorporate the foam and the milk. The milk should have a shiny, glassy smooth surface that is free of any bubbles.
Pulling the shot
Lock in your portafilter and place your coffee cup underneath. I use a small round coffee cup with shallow walls like the picture below.

Any cup will work but if you want to see all the beautiful layers of the espresso and really get the most from your latte art you want a wide mouth and stout cup.
I recommend buying some clear cups. I’m lusting for these ones:

Latte Art
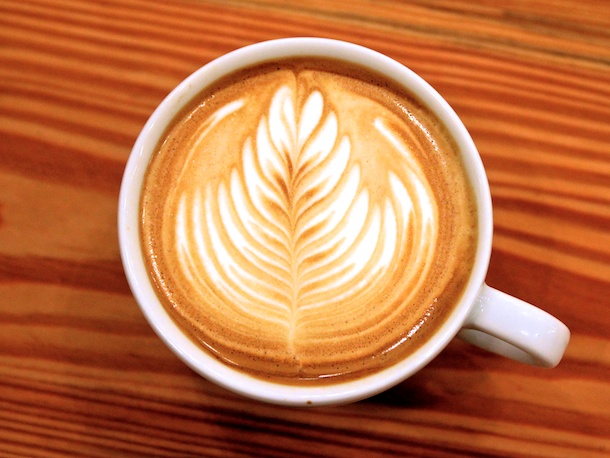
For this part you just need to watch a whole bunch of videos and as everyone else kept telling me… PRACTICE, PRACTICE, PRACTICE! Or you can just follow me on instagam @dinidelivers and watch me keep at every single morning. I’ve almost achieved the heart and somewhat of a rosetta. And no I did not make the rosetta pictured about. But a girl can dream, right?
Hope that helps and I will be doing an instagram live sometime soon covering all of this!

Hey, I’m Dini Klein. I’m a cookbook author (you can shop my book here!) food host, former private chef, wife, and mama to some cute and very energetic kids.
Prep + Rally™ is my solution to getting a wholesome dinner on the table on those busy week nights when juggling mommy-ing and work life feels almost impossible. Prep + Rally is the system helping busy moms all over the world get through it with ease!